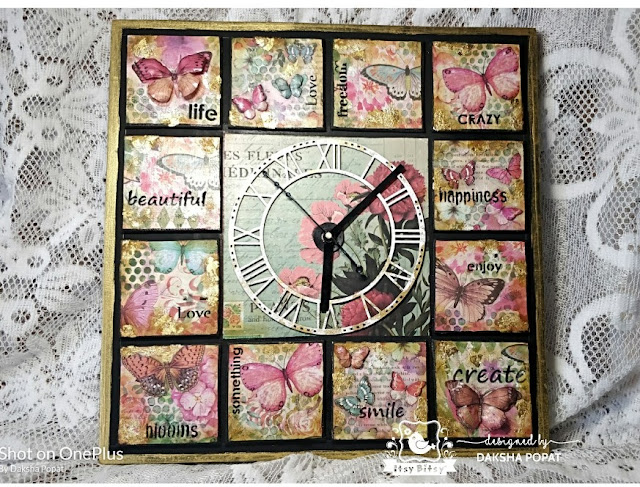
Mini canvas wall clock with volume decoupage...
Hello crafty friends!
Excited to start my second inning with Itsy bitsy....and for this post I wanted to make something very special which I was planning to do from long time..and new release of decoupage papers.. really gave me a kick start for this project...😁so let's start with project and it's detailed step by step instructions..
For this project I have used 12 pieces of 3"*3" mini canvas and base is 3/4" thick plywood in 14"x14".( I explained my project idea to my husband he helped me in this base cutout n fixing the clock parts n all 😊💕)
Step-1: first I did sanding with sand paper.. ( though board was quite smooth)...then roughly arranged all mini canvases as per my imagination and checked ..that how the arrangement is looking 😊
Selected two decoupage design to use for this project..and cut it into 3"*3"size and middle part is 6.5"x 6.5"
Then I decoupaged each mini canvas using little birdie decoupage glue and these 3"*3" cutout designs... I really love these small cute decoupage canvases... getting more n more ideas😄
Next I have applied little birdie white chalk paint in the middle area and then masking the white boarder area gave black chalk paint in rest outside area. I used two coats of both.
Next I decoupaged in the middle part where I am going to fix the dial...(it's not stuck at this stage)
Then gave black chalk paint edges to all mini canvases...at this step I wasn't sure to use black ..as I was liking the plain decoupage canvas look.. without any boarder...but then it's done😔😬
After placing and arranging all mini canvases I did stenciling with archival inks...this really changed the look of each design...
I wanted to use some rough texture to break the monotony ..so I have later used Little birdie sand texture paste with fingers so I can control..as the area is very small...then wasn't sure of that white texture look so to cover it ( not completely) then I have used gold guilding work only on some raised areas.and Iam very happy with the result...then finally I have distress with brown n black archival inks on gold guilding parts and all edges..fixed the MDF clock dial-in it's place using gel medium.
At this stage I thought that my project is complete..but then I got the idea from my leftover paper pieces to use that cute little butterflies somewhere on my design..so I did volume decoupage..
For this I applied required number of butterfly design pieces on sospeso sheet using sospeso glue..once it got dried.. I did fussy cutting..and gave volume to my design using tea light candle and wooden embossing tool.
 https://itsybitsy.in/products/tinted-metallic-paint-50ml-golden-glaze?_pos=55&_sid=7a36fca16&_ss=r
 https://itsybitsy.in/products/grainy-texture-paste200gm?_pos=1&_sid=0206716b2&_ss=r
 https://itsybitsy.in/products/imitation-leaf-14x14cm-gold?_pos=2&_sid=7e3362fd1&_ss=r
Excited to start my second inning with Itsy bitsy....and for this post I wanted to make something very special which I was planning to do from long time..and new release of decoupage papers.. really gave me a kick start for this project...😁so let's start with project and it's detailed step by step instructions..
Step-1: first I did sanding with sand paper.. ( though board was quite smooth)...then roughly arranged all mini canvases as per my imagination and checked ..that how the arrangement is looking 😊
Selected two decoupage design to use for this project..and cut it into 3"*3"size and middle part is 6.5"x 6.5"
Then I decoupaged each mini canvas using little birdie decoupage glue and these 3"*3" cutout designs... I really love these small cute decoupage canvases... getting more n more ideas😄
Next I have applied little birdie white chalk paint in the middle area and then masking the white boarder area gave black chalk paint in rest outside area. I used two coats of both.
Next I decoupaged in the middle part where I am going to fix the dial...(it's not stuck at this stage)
Then gave black chalk paint edges to all mini canvases...at this step I wasn't sure to use black ..as I was liking the plain decoupage canvas look.. without any boarder...but then it's done😔😬
After placing and arranging all mini canvases I did stenciling with archival inks...this really changed the look of each design...
I wanted to use some rough texture to break the monotony ..so I have later used Little birdie sand texture paste with fingers so I can control..as the area is very small...then wasn't sure of that white texture look so to cover it ( not completely) then I have used gold guilding work only on some raised areas.and Iam very happy with the result...then finally I have distress with brown n black archival inks on gold guilding parts and all edges..fixed the MDF clock dial-in it's place using gel medium.
At this stage I thought that my project is complete..but then I got the idea from my leftover paper pieces to use that cute little butterflies somewhere on my design..so I did volume decoupage..
For this I applied required number of butterfly design pieces on sospeso sheet using sospeso glue..once it got dried.. I did fussy cutting..and gave volume to my design using tea light candle and wooden embossing tool.
Then finally using little birdie heavy gel medium I have fixed butterflies in few places.. you can see the result in below pictures..
After completing the whole project.. I thought to use my favourite little birdie Tinted metallic gold paint on outside boarder..and the end result you can see here😄💕.
Hope you have liked my project and for any queries you can ask me in comment box or message me personally...will try to reply.. thank you for stopping by... see you soon with my next post till then take care and happy crafting.
Love n hugs
Daksha
SUPPLIES USED:
 https://itsybitsy.in/products/tinted-metallic-paint-50ml-golden-glaze?_pos=55&_sid=7a36fca16&_ss=r


This is very interesting. thanks for that. we need more sites like this. i commend you on your great content and excellent topic choices.
ReplyDeletewall clock designs