Spring Blooms’ With Sculpture Paste
Hello crafty friends!
For today's post I have a project using Little birdie sculpture paste. This Sculpture paste is a decorative plaster for sculpture painting,3D flowers and relief art. The paste is ideal for 3D designs,holds formations like thin petals and finer details well. Can be used with stencil,best applied with palette knife.its water based. For best results, allow it to dry naturally (do not force dry with a heat gun). After complete drying, you may apply varnish on the project to protect the work from moisture and UV rays. Drying time depends on the applied thickness. Can be used as a relief ornamental paste as well.and it works best with Little Birdie's one step Crackle medium.
(For best and prolonged shelf life, tightly close container after every use.) Now let's see my project and discuss about that.🙂


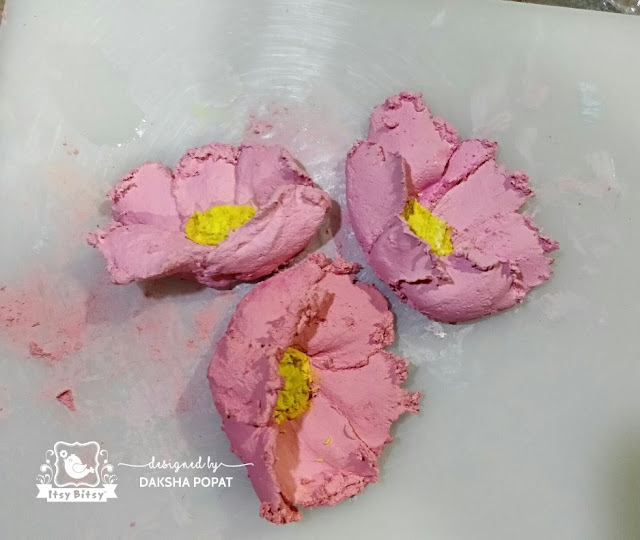
 Step : 2- now as I planned to make pink flowers I add a little red colour in white sculpture paste and made pink sculpture paste...same way I prepared a little yellow paste with a little yellow colour for flower centers.

 Step:3- for flowers I have step by step pictures..where you can see how I have arranged first petal then second and third in middle.. fourth petal from left side and fifth from right side..and for the pollen in the centre of the flower, I have put a little ball of yellow sculpture paste and using toothpick gave that texture look. I have made six flowers in total, in varying sizes.

 Step :5- here in my first picture you can see I have applied little birdie white chalk paint..but later I decided to give Crackle effect so change the base colour to green and on that applied little birdie one step Crackle medium. Dried with heat gun.. and then gave a coat of white chalk paint with a sponge..to get fine crackle effect..and on excitement to see the end result I forgot to take picture of that and started working with my next step😌 sorry I don't have that picture but in next pictures you will see the background.
 Step:6- then for making stem I took out green sculpture paste on to a palette add few drops of water,green colour n little white glue to make a thin paste. put that paste in a plastic cone..and sealed with cellotape.

Step:7- (here you can see crakle effect 🙂) now again I have arranged all flowers as per my referal picture and again did green lines with green marker.( I have used acmoore green alcohol marker)
 Step:8- now using that green cone I have made stems n base of flowers... at this stage I also added few flower buds ☺️
 Step:9- here I have made leaves using green sculpture paste with long palette knife directly on to my arrangement..(as I tried to use dried leaves but it breaks) so it's best to use sculpture paste for leaves directly on your arrangement...
 Here is the complete arrangement. Now it's time to give background colour ,depth and highlights.
 Here I have used green,brown ,pink and yellow in my background..I have used very watery Colors as I didn't want very dark background..just wanted to give watercolor effect on to my background..
 I have applied Color highlights on flowers n leaves also ( you can see in this picture)
 My complete project with background and highlights..here in final stage I have use white chalk paint on all flowers and leaves to highlight. Brown colour on edges to give distress look.
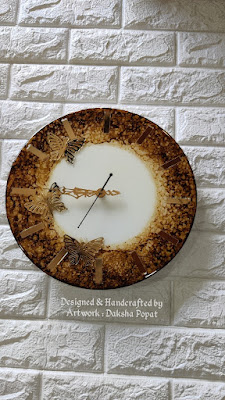
Next day after proper drying I have given a coat of Matt varnish and used one primed chipboard sentiment from little birdie. Here is the final result. You can give hook at the back for wall hanging or use it on the wooden stand.

For today's post I have a project using Little birdie sculpture paste. This Sculpture paste is a decorative plaster for sculpture painting,3D flowers and relief art. The paste is ideal for 3D designs,holds formations like thin petals and finer details well. Can be used with stencil,best applied with palette knife.its water based. For best results, allow it to dry naturally (do not force dry with a heat gun). After complete drying, you may apply varnish on the project to protect the work from moisture and UV rays. Drying time depends on the applied thickness. Can be used as a relief ornamental paste as well.and it works best with Little Birdie's one step Crackle medium.
(For best and prolonged shelf life, tightly close container after every use.) Now let's see my project and discuss about that.🙂

Here for this project first I have made the flowers on an acrylic plate mixing white sculpture paste with little red colour..to get that pink..for leaves I have used green sculpture paste directly, but to make variations in leaves ..I have added green pigment color and made few dark green leaves also...let's talk about the project step by step:

Step-1: first I took out little white sculpture paste on an acrylic palette and smoothed it with a palette knife.


Before starting with flowers..I would suggest you check this VIDEO for easy work with sculpture paste


Step:4- then I took an unbreakable white glass plate and roughly arranged all flowers and using green marker gave stem lines..to get rough idea of my arrangement, at this stage I took one picture of this arrangement for reference..as now I have to prepare the base of the glass plate.


Step:7- (here you can see crakle effect 🙂) now again I have arranged all flowers as per my referal picture and again did green lines with green marker.( I have used acmoore green alcohol marker)


Next day after proper drying I have given a coat of Matt varnish and used one primed chipboard sentiment from little birdie. Here is the final result. You can give hook at the back for wall hanging or use it on the wooden stand.

Thank you for stopping by ,see you soon with my next post..till then bye n take care
Love n hugs
Daksha
SUPPLIES USED:


Hey I for pasting the flower what glue did u use on the glass plate
ReplyDeleteAlso if u could help me with this I intend to use sculpture paste using stencils on small glasses for candles.is it possible?
ReplyDeletePerfect......very very indeed..can you kindly share a video doing it
ReplyDeleteWhat a beautiful and intricate project! The step-by-step process you’ve shared makes it so easy to understand how to use the Sculpture Paste to create such detailed and stunning designs. The crackle effect and the way you’ve added texture to the flowers and leaves is truly inspiring.
ReplyDeleteFor anyone looking to learn more about Russian sculpture paste art, I highly recommend checking out Penkraft. They offer professional workshops where you can learn the art in depth. I personally attended one of their workshops after discovering them through a YouTube video, and it was an amazing experience. Their experts guide you through the techniques and help you bring out your creative potential.
Watch:-https://youtube.com/shorts/Ql8-xhIbI90?si=M-kXcTW01tvp5GxV